If any of your information, which is printed on your carné or which is registered in the Migraciones database, changes, you must apply for a so-called Actualización de datos, formerly known as "Modificación de datos".
So, if you got a new passport, changed your name, got married, moved to a new address, have - depending on your residence visa - a new employer, study at a new university, etc. you must inform Migraciones about it within 30 days. Failing to do so results in a monthly fine of 1% of an UIT (in 2025, that's S/ 53.50).
Depending on the kind of information that changed, you must apply for an "Actualización de datos con emisión de documento" (with the issuance of a new carné) or "sin emisión de documento" (without the issuance of a new carné).
Content overview
- When to apply for the update with the issuance of a new carné and when without
- Update your information with the issuance of a new carné
- Update your information in the Migraciones database without the issuance of a new carné
When to apply for the update with the issuance of a new carné and when without?
Generally speaking, if anything changed that is printed on your carné, such as
- your name
- your marital status
- your address
- your passport number
you must apply for a "Actualización de datos con emisión de documento".
If anything changed that is not printed on your carné, such as
- your employer
- the school or university you are studying at
- the religious entity on behalf of which you are performing religious or missionary activities
you must apply for a "Actualización de datos sin emisión de documento".
Update your information with the issuance of a new carné
Requirements for the "Actualización de datos con (!) emisión de documento"
- Form (automatically filled in during the online application)
- Passport
- Carné
- Receipt for paid application fee (code Migraciones 07561 Formulario F-SPE-001; concept Actualización, inclusión, rectificación y supresión de datos con emisión de documento, S/ 20.20)
- If your first/last name(s) changed: official document proving the change, such as passport
- If your marital status changed:
- If you got married: marriage certificate (1)
- If you got divorced: official document proving that your marriage was dissolved, such as divorce certificate or other divorce papers (2)
- If you are widowed: death certificate of the spouse (2)
- If you moved to a new address: property title deed, rental contract, or sworn statement (Declaracion jurada de domicilio)
- If you have a new passport: new passport
Explanatory notes for the requirements
(1) marriage certificate
- If you were married in Peru at a municipality incorporated into the Reniec system: recent certified copy of your marriage certificate issued by Reniec (not older than 90 days)
- If you were married in Peru at a municpality not incorporated into the Reniec system: Some municipalities in Peru are still not incorporated into the Reniec system and, for example, marriages are registered only on municipal level. So, if you married in such a municipality you must request a certified (!) copy of the marriage certificate from the (provincial) municipality. Inform them that you need the copy for a residence visa application, so the right stamp is put on the certificate. Once you have the document, pay the Reniec fee of S/ 31 under code 02143 “Certificaciones” with concepto “Certificacion de firma” either on pagalo.pe or at any Banco de la Nacion branch. Make copies of the marriage certificate, the payment receipt and DNI, carné or passport. If you apply for the actualización in Lima, you then must proceed to the Reniec office in Miraflores (Av. Diez Conseco 230) or to the Reniec office in Jesus Maria (Jr. Talara 130) to make the so-called 'Solicitud de Authenticacion de Firmas'. At Reniec you are handed a form which you must fill in and then just wait your turn in the “Certificaciones” line, hand in your documents (Certified copy of your marriage certificate, payment receipt, ID and copies and filled in form) and usually within a week or two you can pick up your marriage certificate with another stamp on it. Only now Migraciones will accept your marriage certificate and when you apply the marriage certificate can't be older than 90 days.
- If you were married abroad to a Peruvian: certified copy of your marriage certificate issued by the Peruvian consulate (not older than 180 days) - already in Peru without a recent copy? At the Ministerio de Relaciones Exteriores (RREE) in Lima, you can get certified copies of birth, marriage, and death certificates registered at a Peruvian consulate abroad.
- If you were married to a foreigner abroad: marriage certificate with Apostille or, if the country in which the document was issued didn't sign the Apostille Convention (like Canada, for example) legalized by a Peruvian consulate (not older than 6 months). Once in Peru, the document has to be translated into Spanish and in some cases legalized by the Ministry of Foreign Affairs.
(2) other documents
If you have foreign divorce papers or a foreign death certificate of your partner, the document (even so-called “international” certificates) need an Apostille or, if the country in which they were issued, didn't sign the Apostille Convention have to be legalized by a Peruvian consulate abroad and the Ministry of Foreign Affairs in Peru. Once in Peru, the document has to be translated into Spanish and in some cases legalized by the Ministry of Foreign Affairs.
How to apply for the "Actualización de datos con emisión de documento"
Pay the fee of S/ 20.20 for the Migraciones administrative procedure "Formulario F-SPE-001" under code 07561 and choose the concept Actualización, inclusión, rectificación y supresión de datos con emisión de documento on pagalo.pe or at a Banco de la Nacion branch. As you are already in Peru for a while and paid other fees, you know how the system works; if not check again in our article "Paying administration charges and processing fees in Peru".
Then make PDFs (max size for each document 3MB) from required documents (not necessary for the payment receipt).
Migraciones Agencia Digital
Then open the Migraciones Agencia Digital and click on Entrar.
On the next page, select "Extranjero". Then choose in the drop-down menu passport and enter your passport number (if your passport number changed, use your old passport number, which is still registered). Complete the other fields (birth date, nationality, last time you entered Peru and the Captcha) and click on Verificar. You can as well select Carné de extranjería and enter requested info.
Now you are on the main page of the Agencia Digtal. Here you can either use the search field or find in the menu on the left the point Actualizacion con emission de document. Click on it.
1st page of the "Actualización de datos con emisión de documento" application
Select the Migraciones office or MAC center, which should handle your application (for example, Lima, Cusco, Arequipa, …) and click on siguiente.
2nd page of the "Actualización de datos con emisión de documento" application
On the second and third page you must fill in some data and/or upload for the Actualización de datos con emisión de documento application necessary documents as PDF.
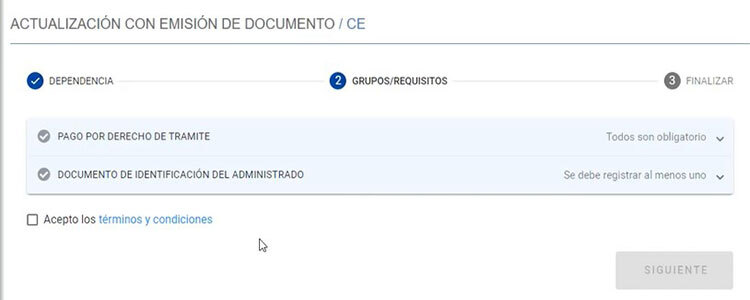
Under "Pago por derecho de tramite" you are asked to enter certain information of the bank receipt
- numero de recibo (number of the receipt) which is the "secuencia de pago" on the pagalo receipt
- codigo de verficación (verification code) which is the "codigo control" on the pagalo receipt
- fecha de recibo (date) which is the "fecha de operación" on the pagalo receipt.
After entering the requested info, click on Validar.
Under the "Documento de identificación del administrado" tab, select the document, which is registered (in most cases passport), fill in required information (passport number, date of issue, country of issue) and upload a copy. If your passport changed, enter here the information of your old, already registered passport.
When your bank receipt and ID is accepted, there is a green check in front of both tabs. Accept the terms & conditions and click on Siguiente.
3rd page of the "Actualización de datos con emisión de documento" application
You now see this on your screen:
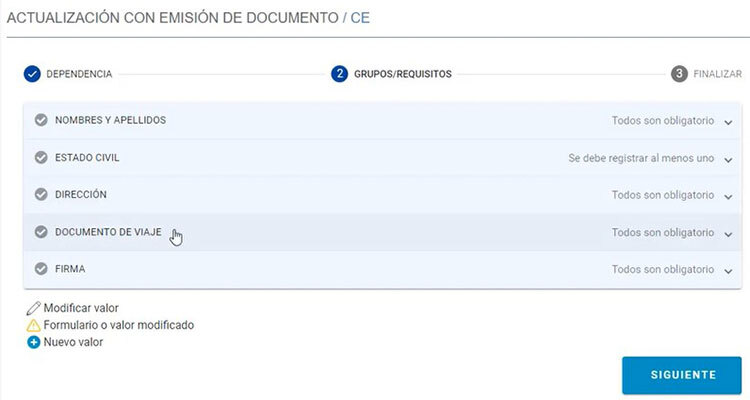
Be aware that you only have to select the tab which information must be changed and fill in / upload the document required. You don't have to bother with the other tabs and can leave them blank.
If your name or surname changed, click on the little arrow next to the "Nombres y apellidos" tab and upload, for example, your passport with your correct name.
If your marital status changed, click on the little arrow next to "Estado civil" tab, and then select the subpoint that applies:
- If you got married, upload your marriage certificate.
- If you got divorced, upload an official document proving that your marriage was dissolved, such as a divorce certificate or other divorce papers.
- If you are widowed, upload the death certificate of your spouse.
If your address changed, click on the little arrow next to "Dirección" tab and upload either a property title deed, your rental contract or a sworn statement (Declaración jurada de domicilio).
If you have a new passport, click on the little arrow next to "Documento" de viaje tab, select passport, enter your new passport number and upload a copy of your new passport.
Then click on Siguiente.
4th page of the "Actualización de datos con emisión de documento" application
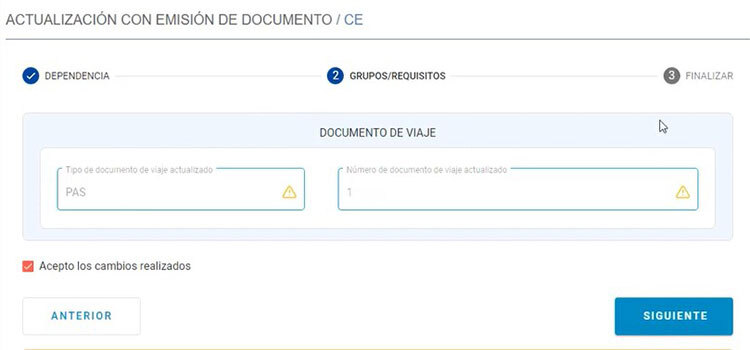
You then get to a page showing which information on your carné should be changed. Make sure that everything is 100% correct and then accept the change. Click on Siguente.
5th page of the "Actualización de datos con emisión de documento" application
You now see the "Actualización, inclusión y supresión de datos con emisión de documento" displayed on your screen. That's the confirmation of your successful application. Download and/or print the form and keep it safe. Click on Finalizar.
Getting your new carné
Officially, the processing time of the "Actualización de datos con emisión de documento" only takes 3 business days. However, according to feedback we got from our readers, it usually takes around a week or two until you get a notification from Migraciones in your Buzon with the official resolution that the update of your information was registered.
However, you are not done yet. You still need your new carné. So, once again check your Buzon regularly and wait for a second notification from Migraciones (Notificación expedición del carné) informing you that your carné was issued.
Officially Migraciones has another 30 business days counted from the approval of your application to send the expedición del carné notification. However, some of our readers shared that they had to wait only a couple of days, others three or four weeks, and a few even 2 months.
As soon as you got the official notification that your carné is ready, get going.
Be aware that in some Migraciones offices you need an appointment to pick up your carné while at others, especially in the provinces, no appointment is needed and you can just show up any time, any day or at a specific day and/or time. Please check with the Migraciones office where you applied.
If you need an appointment, then just enter the Agencia Digital. On the main page in the left menu under "Citas en linea", subpoint "para recojo de documentos" make an appointment to pick up your carné. Once again, download and print the confirmation and keep it safe.
Please note: Especially in Lima it can be a mission to get an appointment to pick up your carné. Your only option is to try again and again and again, tomorrow, the day after, a week later, ...
If, for whatever reasons, you urgently need your updated carné, but can't get an appointment to pick it up, you can download a document on the Agencia Digital confirming that you have a current carné despite not having the actual new card in your hands yet. On the main page of the Agencia Digital in the left menu, click under "Constancias" on the point "Carné de Extranjería". You get a page with the data that is printed on your carné, which already shows the changes you made. Below just confirm "Estos son los datos con los cuales se emitirá su constancia ...." by clicking on the little square and click Siguiente. Now, the "Constancia de Emisión de carné de Extranjería" is displayed on your screen. Just download it and, if necessary, print it and for now you at least have proof that you have a carné with your correct personal data on it.
Anyway, to pick up your carné you need your passport. If you have an appointment you as well must bring your printed (!!!) appointment confirmation. Best be at the Migraciones office 15-30 minutes before. Migraciones personal will point you in the right direction where you are handed your carné.
Congrats! You made it!
Update your information without (!) the issuance of a new carné
Requirements for the "Actualización de datos sin emisión de documento"
- Form (automatically filled in during the online application)
- Passport
- Carné
- Receipt for paid application fee (code Migraciones 07561 Formulario F-SPE-001; concept Actualización, inclusión, rectificación y supresión de datos sin emisión de documento, S/ 5)
- If your employer changed: work contract
- If you study at a new university: enrollment certification
- If you serve under a new religious entity: letter from the new religious entity
How to apply for the "Actualización de datos sin emisión de documento"
Pay the fee of S/ 5 for the Migraciones administrative procedure "Formulario F-SPE-001" under code 07561 and choose the concept Actualización, inclusión, rectificación y supresión de datos sin emisión de documento on pagalo.pe or at a Banco de la Nacion branch. As you are already in Peru for a while and paid other fees, you know how the system works; if not check again in our article "Paying administration charges and processing fees in Peru".
Then make PDFs (max size for each document 3MB) from required document(s) (not necessary for the payment receipt).
Migraciones Agencia Digital
Then open the Migraciones Agencia Digital and click on Entrar.
On the next page, select "Extranjero". Then choose in the drop-down menu passport and enter your passport number. Complete the other fields (birth date, nationality, last time you entered Peru and the Captcha) and click on Verificar. You can as well select Carné de extranjería and enter requested info.
Now you are on the main page of the Agencia Digtal. Here you can either use the search field or find in the menu on the left the point Actualizacion sin emission de document. Click on it.
1st page of the "Actualización de datos sin emisión de documento" application
Select the Migraciones office or MAC center, which should handle your application (for example, Lima, Cusco, Arequipa, …) and click on siguiente.
2nd page of the "Actualización de datos sin emisión de documento" application
On the second and third page you must fill in some data and/or upload for the Actualización de datos con emisión de documento application necessary documents as PDF.
Under "Pago por derecho de tramite" you are asked to enter certain information of the bank receipt
- numero de recibo (number of the receipt) which is the "secuencia de pago" on the pagalo receipt
- codigo de verficación (verification code) which is the "codigo control" on the pagalo receipt
- fecha de recibo (date) which is the "fecha de operación" on the pagalo receipt.
After entering the requested info, click on Validar.
Under the "Documento de identificación del administrado" tab, select the document, which is registered (in most cases passport), fill in required information (passport number, date of issue, country of issue) and upload a copy.
When your bank receipt and ID is accepted, there is a green check in front of both tabs. Accept the terms & conditions and click on Siguiente.
3rd page of the "Actualización de datos sin emisión de documento" application
Be aware that you only have to select the tab which information must be changed and fill in / upload the document required. You don't have to bother with the other tabs and can leave them blank.
If your employer changed or the school or university you are studying at or the the religious entity on behalf of which you are performing religious or missionary activities, click on the little arrow next to the "Organización" tab. Select the point that applies and upload the corresponding document. Additionally enter the name of your new company, university/school, religious entity.
The other tabs "Datos familiares" and "Lugar de nacimiento" only apply to certain visa types and are rarely needed. Here you could, if applicable, change information regarding your family situation or, in case your birth place was misspelled, apply for a correction.
Then click on Siguiente.
4th page of the "Actualización de datos sin emisión de documento" application
You then get to a page showing which information in the Migraciones database should be changed. Make sure that everything is 100% correct and then accept the change. Click on Siguente.
5th page of the "Actualización de datos sin emisión de documento" application
You now see the "Actualización, inclusión y supresión de datos sin emisión de documento" displayed on your screen. That's the confirmation of your successful application. Download and/or print the form and keep it safe. Click on Finalizar.
Officially, the processing time of the "Actualización de datos sin emisión de documento" only takes 3 business days. However, according to feedback we got from our readers, it usually takes around a week or two until you get a notification from Migraciones in your Buzon with the official resolution that the update of your information was registered.
Congrats! You made it.
Please note: We from LimaEasy are not a Peruvian government agency, a public authority or (immigration) lawyers. All information is published to our best knowledge and should be seen as general guidance introducing you to Peruvian regulations and procedures. All information is subject to change, as regulations, requirements, and processes can change quickly without prior notice!
And if you find something wrong on this page, please help us to keep this guide as up to date as possible and contact us either below with a comment or use our contact form. Thank you!


